Diablo Update-Mast, Sail and Rig.

> 10 years ago
Reply
Register to post, see what you've read, and subscribe to topics.
cisco
cisco
QLD
12365 posts
QLD, 12365 posts
25 May 2009 4:30am
At last had the opportunity today to take it out for it's first sail since Yeppoon.

The sail is courtesy of Paul Day and is one of his 4 metre poly sails. It worked very well at Yeppoon with one of his stiff alloy tube masts. It may have been too stiff to allow all of the belly of the sail to be flattened out when fully sheeted but does not seem to be a problem with the kevlar mast I have made up for it, as the photo shows.


These are three windsurfer masts I picked up at the dump shop for $20 and a radio ariel mast I had. The masts are 4.5 m long (a tad short) and two are fibreglass and the other kevlar I am told.

I cut the kevlar mast into three 1.5 m lengths and one of the fibreglass masts was sacrificed to make internal joiner sleeves for the sections and the balance used for the boom. The top section of the radio mast was used for a 330 mm extension at the top of the mast. Part of the lower section of the radio mast was used for the upper joiner sleeve.

The alloy reinforcing tube inserted into the lower section with silicon protrudes 80 mm at the bottom and the joiner sleeve at the top end protrudes 210 mm.
The joiner sleeve in the next section protrudes 330 mm. This has resulted in the three mast sections and the boom with the goose neck all being roughly the same length at 1.8 m. Unfortunately this is too long for the boot of the Fairmont.


But not so the rest of the yacht.


This photo shows the alloy reinforcing bars under the yacht not previously shown in the build thread. The bolts at the rear bar also carry the seat belt on the upper side. The attachment of the seat at the front bar is done with a U bolt.


This is a modification of Paul's plan I recommend to prevent or limit the seat back being pulled up when sheeting, ie put two bolts through instead of just one. It limits bellmouthing of the socket also. Maybe Paul's socket is longer than mine but his is 2 mm wall RHS while mine is 1.6 mm RHS.


Looking at this shot you can see the sail is almost fully sheeted. The sail and mast pocket are quite flat except by way of the second and third batten up, also slightly at the fourth batten. With a good wind load in the sail I think it will shape very well. The battens in this sail are quite a bit stiffer than what you see in a blokart sail.


This downhaul I believe has been termed the racing downhaul. The white band at the bottom of the mast is a split piece of PVC drain pipe riveted to the mast and tapered on the lower edge to take up the small clearance between mast and step and cushion the mast against the step.
When the yacht is set up there is preload on the down haul but after some sailing this gets stretched out. The extra holes in the strut allow it to be reloaded.
The white mark just below the gooseneck is where the internal reinforcing tube comes to. When fully sheeted the gooseneck comes to just below it.
The gooseneck and the timber dowel that carries it are retained by the through bolts attaching the saddles to the boom.


The sheet blocks are the cheapest Ronstan blocks I could find at $10.20 each and the becket block $8 more. They are for 10 mm sheet but I have used 12 mm sheet. A bowline at the becket was too bulky so the bight in the rope was sewn and bound with heavy sail twine. I will later cut a hole in the under side of the boom to recess the sheet blocks inside the boom as Paul does.
The blocks are just sheave on pin units but with regular application of Lanox or silicon should do the job quite fine.


By the time (2:30 pm) I arrived at the paddock the wind had moderated at around 12-15 kts. Good for a first time with a new yacht at this location limited by sleeper fences at each end. Due to the way I set up the axles, ground clearance of this yacht with pilot aboard is only an inch at best. Therefore the chassis bottoms on the bumps and the grass causes constant drag. I will be remounting the axles following Kody's mounting method which is light and simple and should then have a ground clearance of around 3 inches.

The yacht performed well and reached a peak speed of possibly 25-30 kmh with the windward wheel lifting a few times. In these conditions at this venue a blokart would most likely be faster but in the hands of a more capable pilot than myself that might not be the case.

I was on my own today so sorry no action shots but if the wind persists tomorrow we will take a blokart as well.
Cheers Cisco

kiwi307
kiwi307
488 posts
488 posts
25 May 2009 3:47am
Hi Cisco, looks great.
A few comments to think about (or discard as you see fit).
If the downhaul is stretching, try something more gutsy in the cordage. I'm not sure what you have used there, spectra or a pre-stretch might help.
It may be worth trying pulling the sail forward on the boom just a touch before you firm up on the outhaul. It looks as though there is a lot of tension on the pocket right at the tack.
I found these downhauls need to be set up parallel with the mast to work their best.
But it looks great. Well done.
Hiko
Hiko
1229 posts
1229 posts
25 May 2009 6:27am
Cisco it looks really good Its given me some more inspiration for my mini
I see you have the extra bolt in the seat back you were talking about
A question on your Fallshaws are they 400x8 ? Paul has 8x250 pw on his plans
but I dont see that in Fallshaws catalogue they have a PWB10 that I think may be them but not sure
Gizmo
Gizmo
SA
2865 posts
SA, 2865 posts
25 May 2009 2:27pm
Cisco, I have just measured the angle of the mast and I come up with about 15-16 deg.
Now i know that it is fully sheeted in which brings the mast back, but just checking that the mast tube base is, as on the plans... 10 degrees.
Its actually the best shot of a LLMini so far (to take angles etc off)
Looks a nice yacht.
cisco
cisco
QLD
12365 posts
QLD, 12365 posts
25 May 2009 5:09pm
Thanks guys for the positive comments. You realise of course it is still a work in progress.

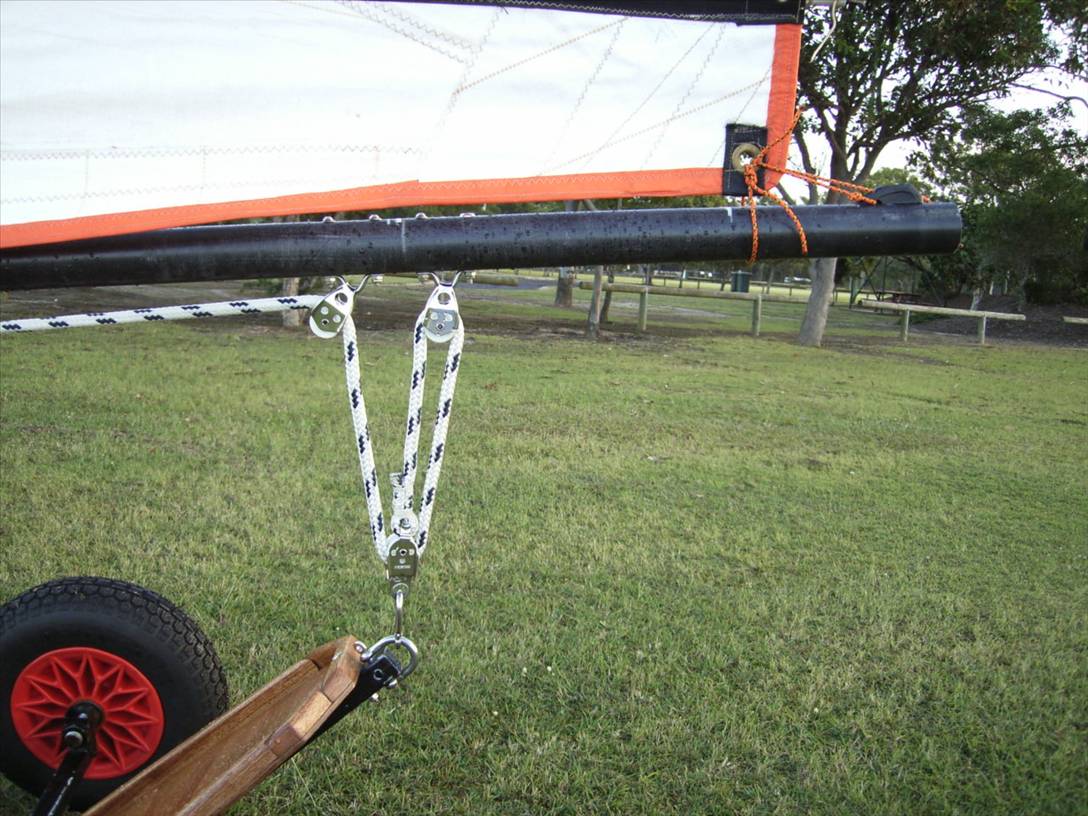
Kiwi:- The downhaul line is just yacht braid I grabbed off the reel at the marina. They don't carry much spectra. But like you say I could go up a size.
Re the tension on the mast pocket at the tack. Paul is probably looking at the photo and saying "Tutt, tutt, tutt, he is not paying attention again. I told him to tie the tack eye to the mast with a length of spectra." Didn't have a bit handy so went without.
He also eschews the use of shackles due to their uselessness when the pin is lost in the sand.
I used a long series shackle at the tack because of the absolute struggle getting a short one in which guarantees dropping the pin in the sand. The long series shackle has the result as you can see of allowing the outhaul to pull the tack back. Use of the aforementioned spectra should fix it.

I thought that angle on the downhaul would have the effect of pulling the boom and therefore sail in towards the mast. I could parallel it up a bit by attaching the lower end of the downhaul to the bottom hole of the strut. I will give it a try and let you know if there is a noticeable difference. Thanks.

Hiko:- Here is a link to the Fallshaw site if you do not have it already http://fallshaw.com.au/index.html and this one to the page for those wheels.
fallshaw.com.au/core_wheels_pages/core_wheels_pneumatic_plastic/core_wheels_pneumatic_plastic.htm. The part No. for them is 400X8KNO-PWB10 but make sure you also order the 6204 housings (that is the part number and two per wheel) which will allow you to fit the 6204 bearings. These fit a 20 mm axle and being a more common bearing seem to be cheaper. A guy in Maryborough here found them at a pool shop for about $6 each. Apparrently they are used in swimming pool pumps.

With the wheel part No., 400 I believe refers to the metric rolling diameter of the tyre, the 8 refers to the imperial rim diameter. Confusing to say the least. KNO refers to the knob tread tyre which is the only one they supply for that rim. The actual tyre size moulded into the wall of the tyre is 4.80/4.00-8. The PWB and PWA would seem to indicate bearing or axle mount.
When you go into the shop to buy replacement tyres, revert to the vernacular and say "Mate, I'm after ribbed tread tyres to fit a 4" wide, 8" diameter rim. Can you get them for me with tube for less than $30?". He might say "Yeah mate, I can do the tyre and tube but your price is prehistoric."

You will have to wear the knobs off your tyres on the bitumen or power plane them off as Paul does. Be careful with that one.

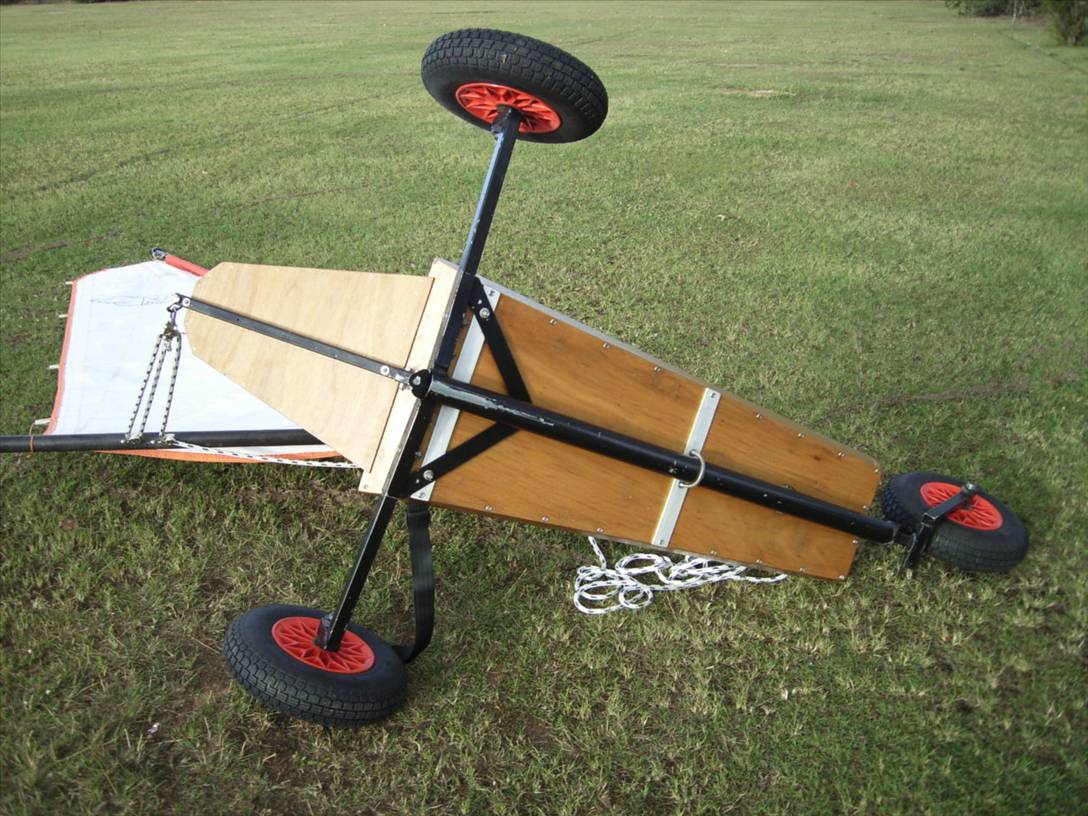
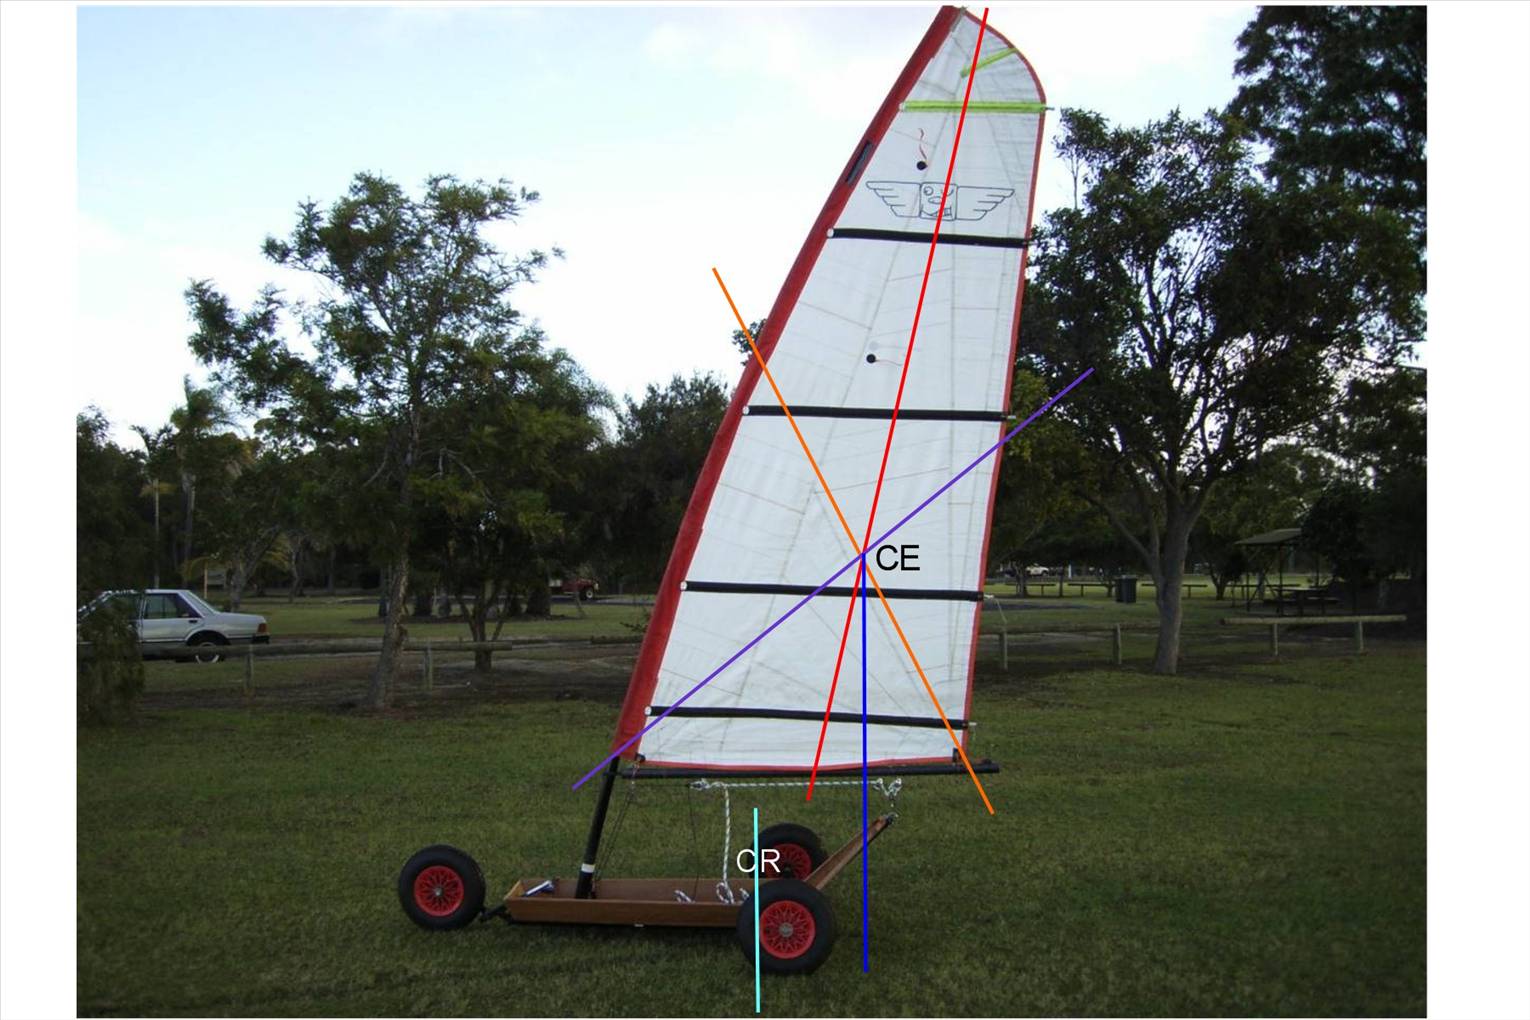
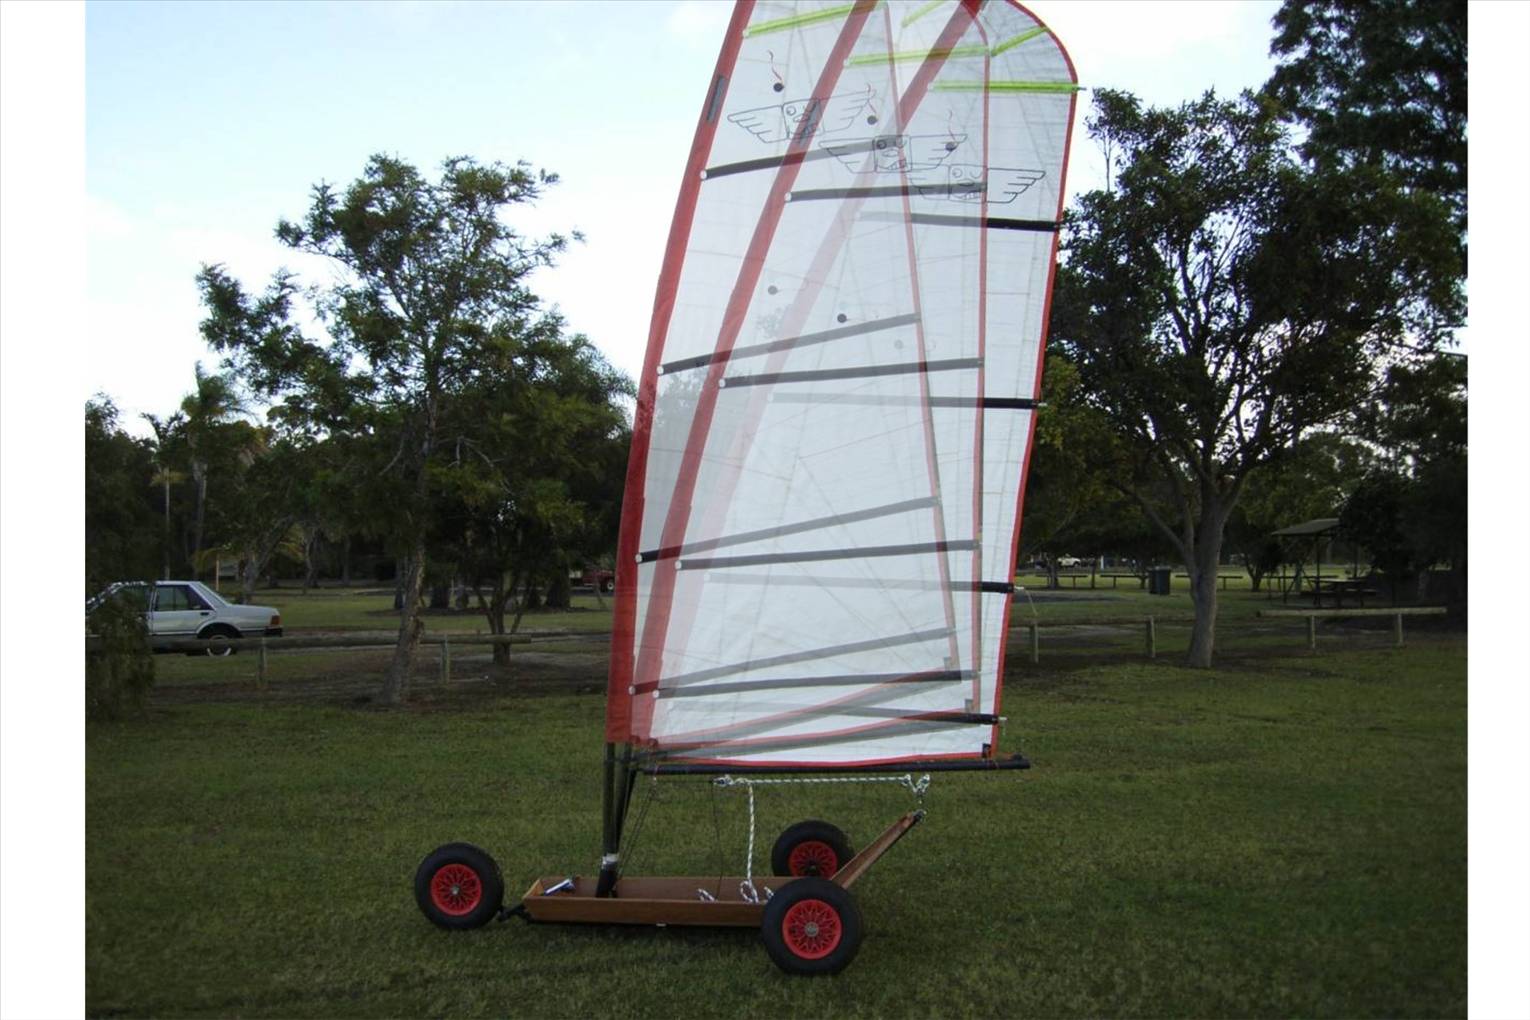
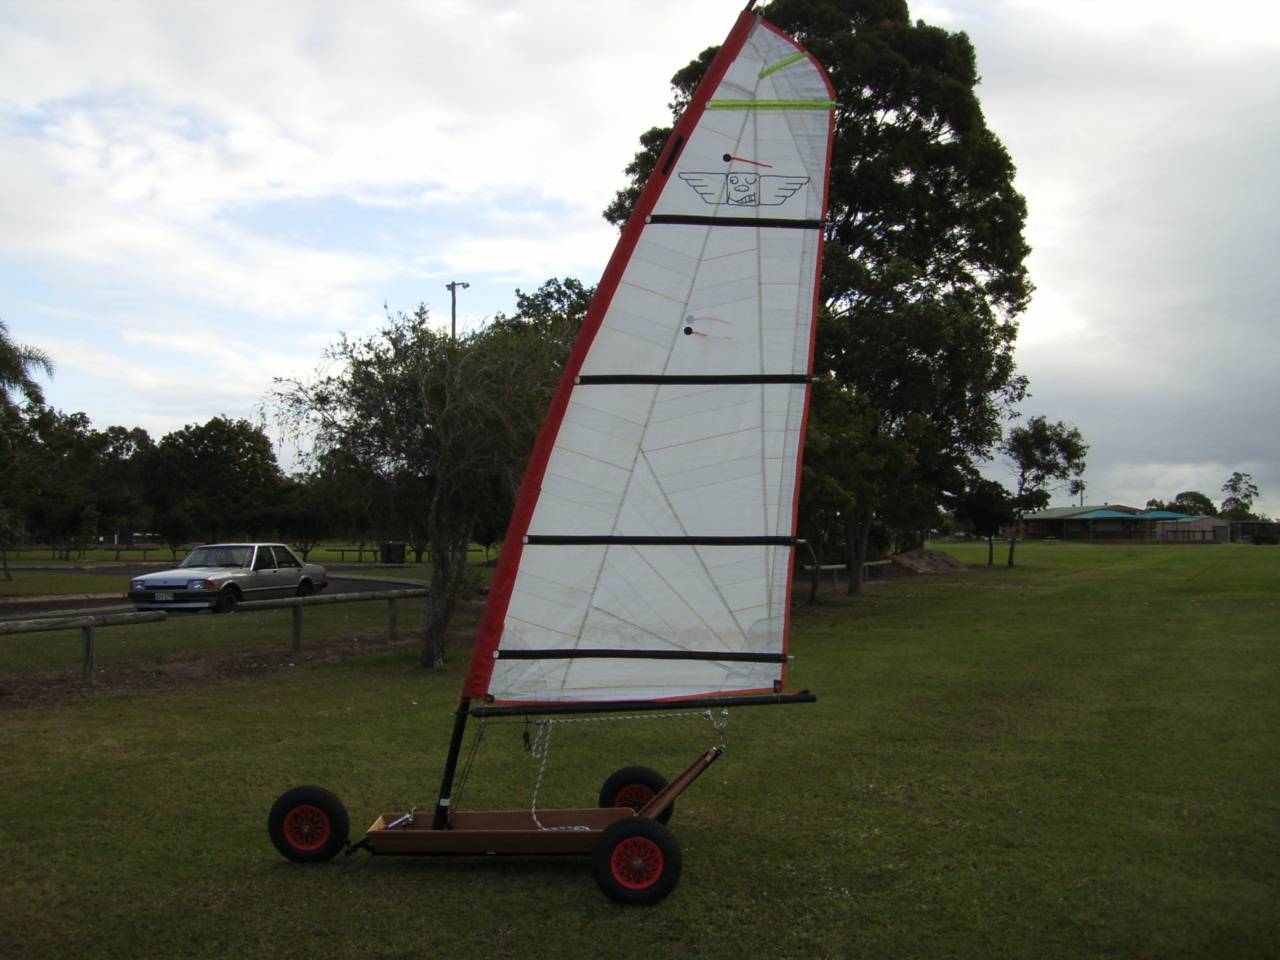
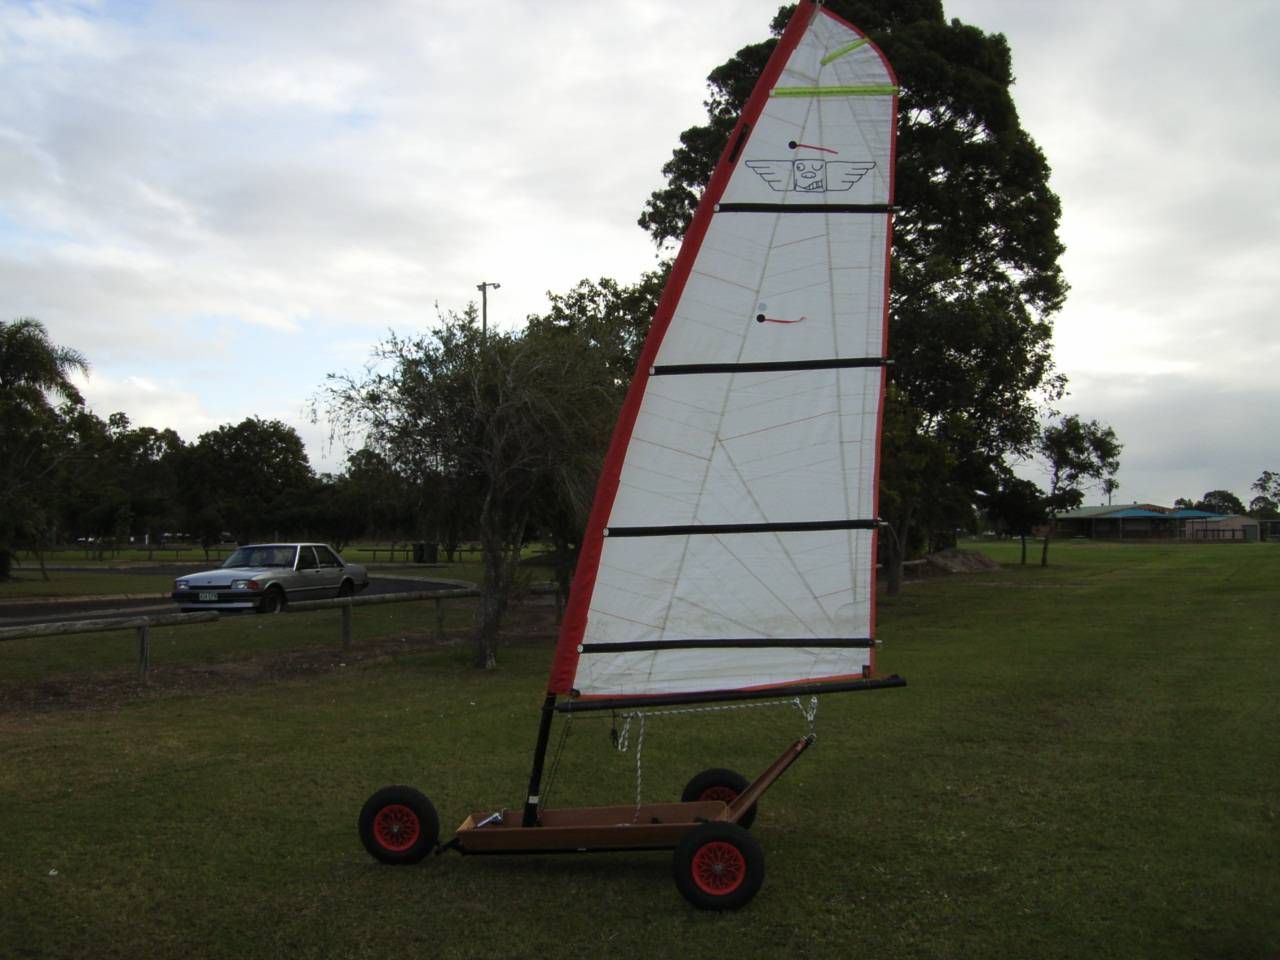
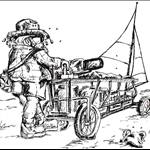
Gizmo:- The photo of the full yacht was especially for you. 
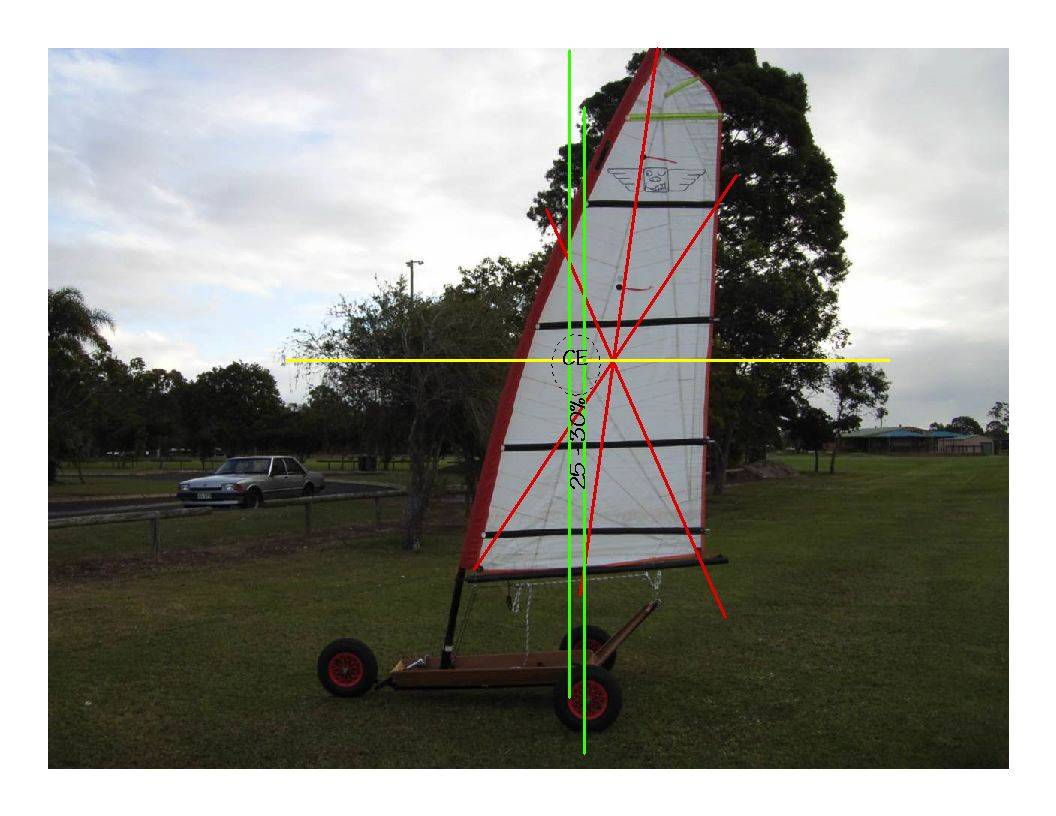
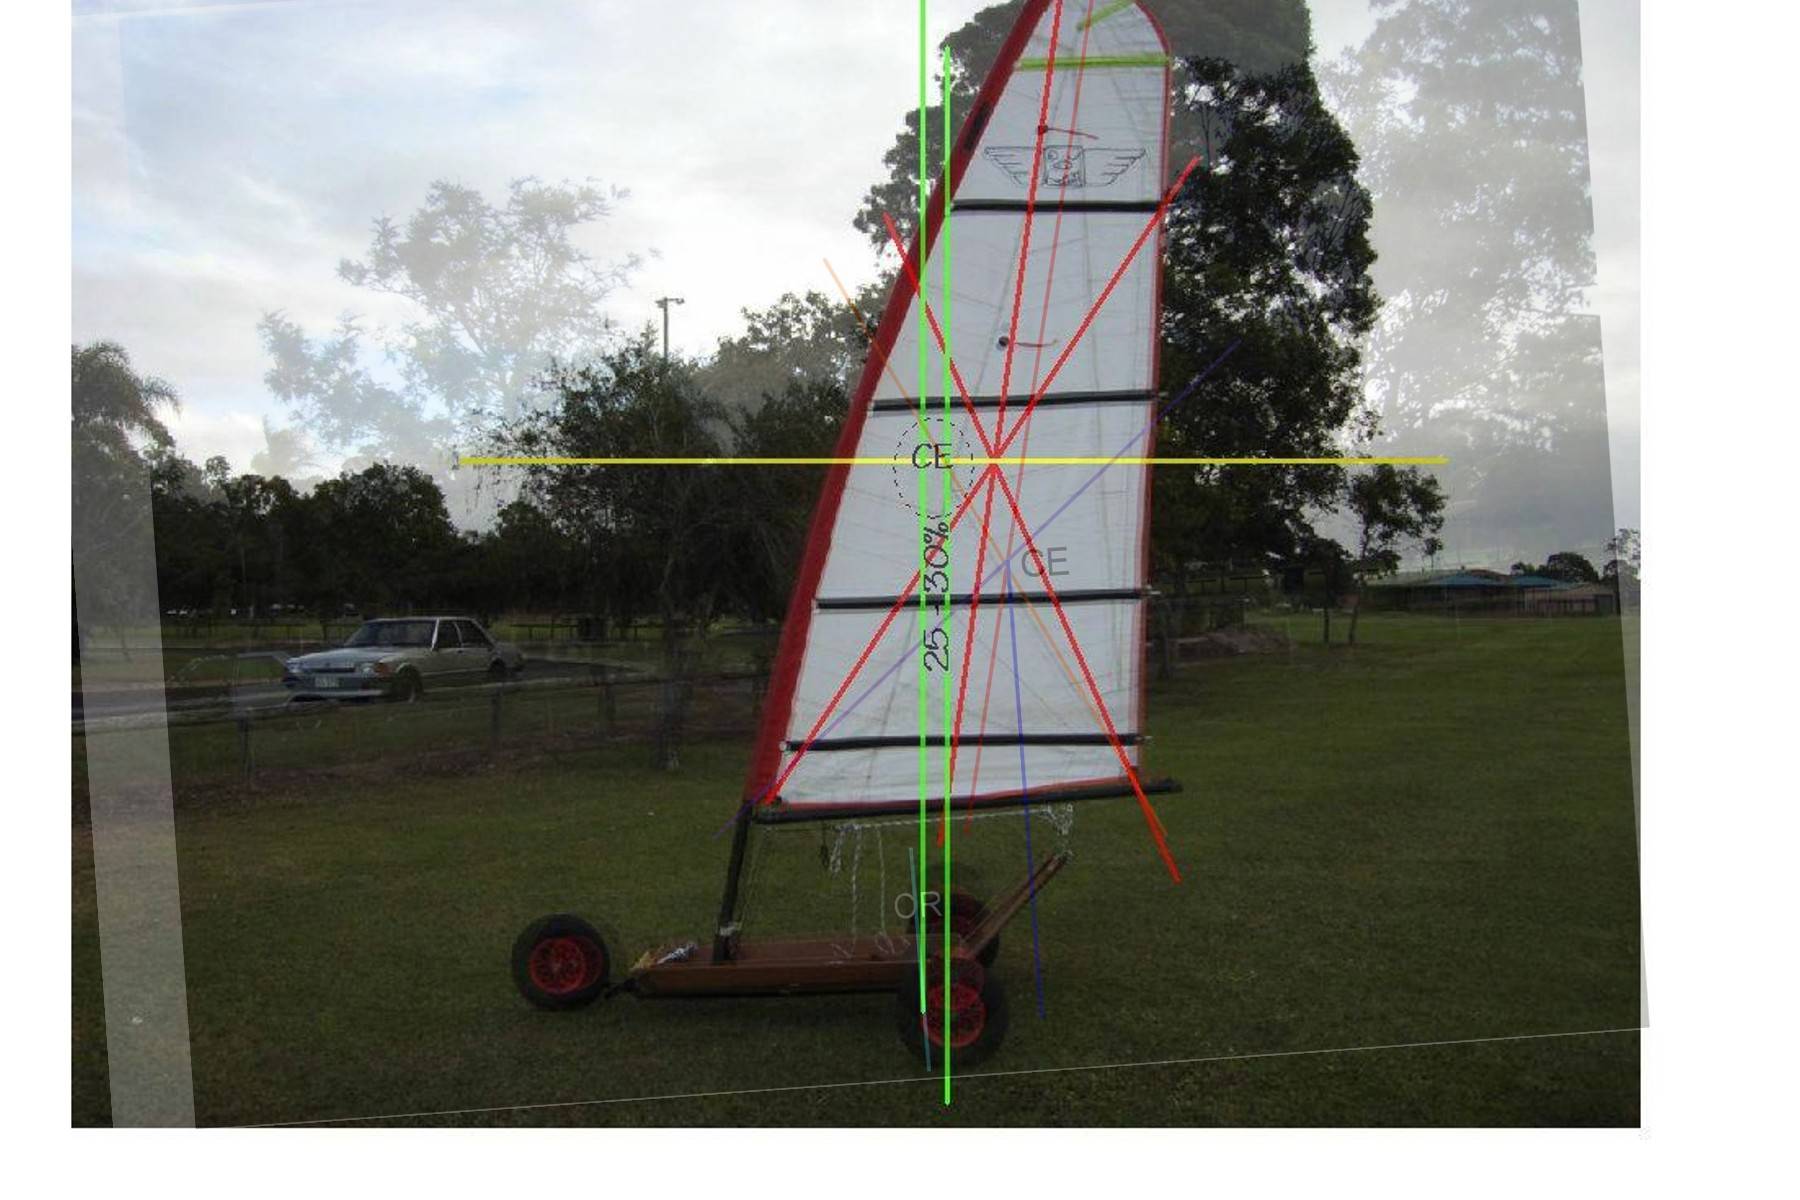
Where is the CE/CR overlay?? I thought you would have done that without prompting.
Yes, the mast step IS 10 degrees to the spine tube and there is little or no play in the fit of the mast to step. Also there is no slop in the fit of the section joints.
It does look like the CE is behind the CR and this seems to be confirmed by the handling of the yacht at Yeppoon. At speed even a slight amount of oversteering wanted to throw it into a slide on the sand and I felt it slightly on the grass yesterday. No wind today, so therefore not out sailing and in here writing this .

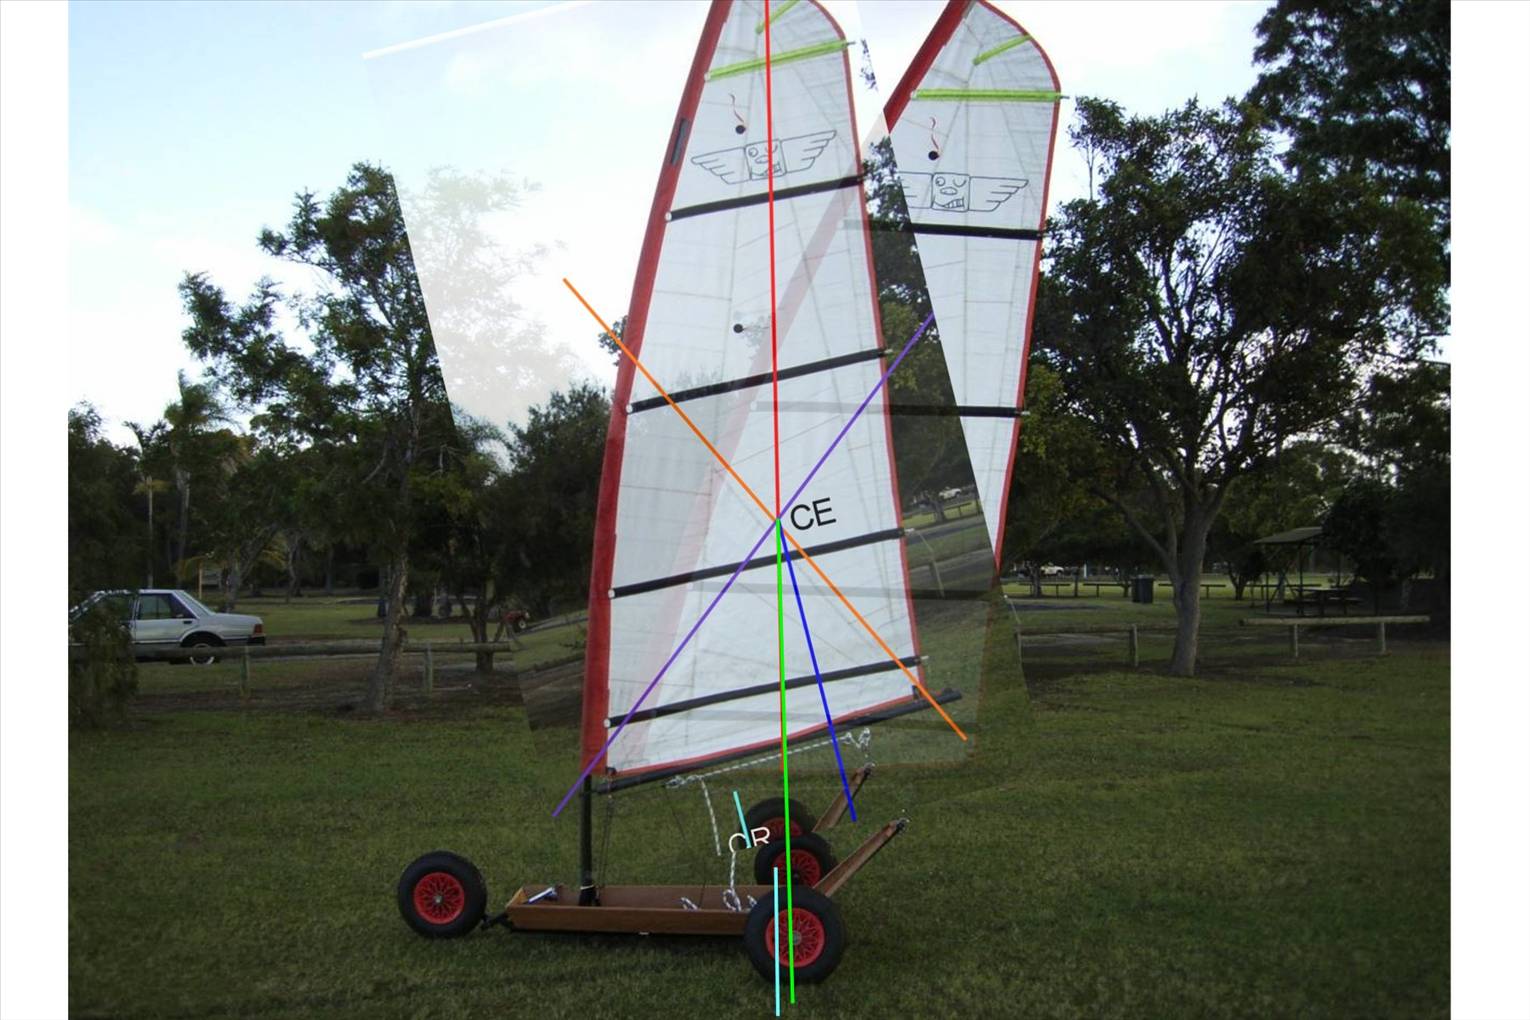
If you refer to my comments on ground clearance and have a close look at the photo you will see that the yacht is slightly lower at the rear. I made two forks during the build. One for low clearance and one for high. I said that I will remount the axles to Kody's method. I will actually make new axle extensions to his method so I can revert. Doing this will raise the rear about 2" and if I retain the present front fork thereby tilting the whole yacht forward and bring the CE forward relative to the CR the balance and handling should improve.

Am I on the right track with this?? More input is more than welcome. Again thanks for your comments gentlemen. Cheers Cisco
Gizmo
Gizmo
SA
2865 posts
SA, 2865 posts
25 May 2009 5:15pm
Here it is for you.....And your right... the CE is actually well past CR

Gizmo
Gizmo
SA
2865 posts
SA, 2865 posts
25 May 2009 5:34pm
Ok Cisco, how about this... this is how the yacht would look with zero deg. Mast step rake. The CE and CR would align, but would it change the performance at all??? or maybe split the difference and go 5 deg.

Here is a mix of Zero, Five & Ten degrees..


cisco
cisco
QLD
12365 posts
QLD, 12365 posts
25 May 2009 6:23pm
Thanks for that Brian. Looking at the photo, it appears to be quite a large sail on a fairly small yacht. This is the first time I have been able to look at it from this perspective.

I have a dacron Gaastra sail in fairly good condition which when recut will result in a 3 to 3.4 m sail. It may be more efficient than this one in stronger airs. I will do that before any reproductions of this sail and keep it for Nappy Rush.

BTW, the grey wheel that came with Nappy Rush did not survive sitting in the hot sun. It just all of a sudden went BANG blowing the tyre off the rim. The dog didn't like it at all and went racing inside for cover.LOL

Soon I will post a couple of shots of this sail and the Gaastra in overlap. Cheers Cisco
cisco
cisco
QLD
12365 posts
QLD, 12365 posts
25 May 2009 6:28pm
Gizmo said...

Ok Cisco, how about this... this is how the yacht would look with zero deg. Mast step rake. The CE and CR would align, but would it change the performance at all??? or maybe split the difference and go 5 deg.


It certainly looks better but I will do the axle thing first before cutting off and reattaching the mast step.

It also looks to be an improvement on sheeting and downhaul. Another thing I will try is reducing the sheeting power by use of only one block on the boom.

I do believe there is a substantial difference in performance and handling between the use of the stiffer alloy mast and the more flexy windsurfer mast. Might pay (about $250-$300 for alloy) to do that comparison experiment before cutting and welding.

kiwi307
kiwi307
488 posts
488 posts
25 May 2009 4:51pm

With the wheel part No., 400 I believe refers to the metric rolling diameter of the tyre, the 8 refers to the imperial rim diameter. Confusing to say the least.

I don't think it's quite as bad as you think!
From what I have been told this is the "400" part of the tyre dimension, ie nominal sidewall height (as in the 4.80-4.00) width v height.
I am pretty sure that if you measure your inflated tyre you will find overall diameter of 16". ie 4(.00) + 8 (wheel) + 4(.00) = 16.
Could be wrong, but that's what is always used to be.
Interestingly cycle wheels (BMX etc) measure over the outside of the tyre, which is why a number of different sized cycle tyres will fit the same rim. So Clems' favorite 16" wheel is the same OD as your wheels. (Only cycle wheels use this form of measuring, not motorcycle, cars, wheelbarrows etc)
cisco
cisco
QLD
12365 posts
QLD, 12365 posts
25 May 2009 7:18pm
Like you say, it depends what kind of shop you are in. I actually ran the tape measure over the wheel before writing that and it's rolling dia is 400mm near enough.

Different shop, different jargon. The building trades are the worst.

Therefore my suggestion:-
When you go into the shop to buy replacement tyres, revert to the vernacular and say "Mate, I'm after ribbed tread tyres to fit a 4" wide, 8" diameter rim. Can you get them for me with tube for less than $30?". He might say "Yeah mate, I can do the tyre and tube but your price is prehistoric."

We get there eventually, just takes twice the number of words to do it.
Hiko
Hiko
1229 posts
1229 posts
25 May 2009 6:20pm
Thanks for all the info guys will be getting on to the wheels and tyres this week
so its all come at the right time
Will be interested in the out come of the maststep angle I have already set mine at 10 degrees I think I will hold fire on the chassis painting etc until that is resolved
I guess I could put the rig up on the bare chassis and see how my sail looks
You are right about the 16 inch bike wheel kiwi mine measures 400mm diameter over the tyre
cisco
cisco
QLD
12365 posts
QLD, 12365 posts
25 May 2009 9:24pm
Don't wait for me Hiko. I usually have long breaks between spurts of activity.

I don't think cutting the mast step off and welding back on is too difficult if done carefully. Let the welding cool slowly and strength should be maintained.
landyacht
landyacht
WA
5921 posts
WA, 5921 posts
25 May 2009 9:41pm
Leave that mast step alone!
youve got the clew shackled AND tied, which would account for that rope that should be around the mast.
by the time you get rid of ALL the shackles on the back of your boom and drill 4 little holes and a slot youll get the boom down to a better hieght, Or you could lay thet easyboy back to a more respectable angle.
also set your front saddle right at the front of the boom perpendicular if neccesary, so the downhaul pulls down..
stand the back up to its right height........
all in all , not a bad job.
400 means 4.00 inches, they just dropped off the decimal point.
present WA price fo a 4ply4.00x8 WITH tube is $16.00( not from B*nn^ngs)
cisco
cisco
QLD
12365 posts
QLD, 12365 posts
26 May 2009 1:32am
landyacht said...

Leave that mast step alone!

I have no problem with that.


youve got the clew shackled AND tied, which would account for that rope that should be around the mast.

Yep, sorry.

by the time you get rid of ALL the shackles on the back of your boom and drill 4 little holes and a slot youll get the boom down to a better hieght,

They were already on the to do list.


Or you could lay thet easyboy back to a more respectable angle.

That is not on the list unless absolutely necessary. A fairly major rework for this yacht.

also set your front saddle right at the front of the boom perpendicular if neccesary, so the downhaul pulls down..

Yeah, I will play with that but will probably need a new timber dowel in the boom.

stand the back up to its right height........

Absolutely. It was OK on the hard smooth sand of Yeppoon but not on the grass. It was twice as hard to push off with hands on the wheels as a blokart.

all in all , not a bad job. Thank you.
400 means 4.00 inches, they just dropped off the decimal point.
present WA price fo a 4ply4.00x8 WITH tube is $16.00( not from B*nn^ngs)

You were going to tell us who the retailer is. Are they national with shops on this side of the rock?


j murray
j murray
SA
947 posts
SA, 947 posts
26 May 2009 4:21am
Cisco......not being a teckhead, you have a wonderful entrainment machine. If i were doing trade marking, I recon a 9 near as good as it gets it has the potential to- b- a chick magnet...........careful [}:)]
kiwi307
kiwi307
488 posts
488 posts
26 May 2009 3:58am
Might pay for a couple of people to check on sail terminology here! The clew of this sail is tied, the tack is shackled and tied!
Hiko
Hiko
1229 posts
1229 posts
26 May 2009 12:58pm
That CE that is marked on the sail is that in the right place?
Looks far back to me
Gizmo
Gizmo
SA
2865 posts
SA, 2865 posts
26 May 2009 3:14pm
Maybe could go 50mm forward, the curve on the head tends to muck things around a bit... it was a "guesstamation" only
Things like CE and CR changes quite a lot when sailing.
Cisco mentioned that the back end was sliding around a lot when sailing which tends to indicate that the CE is well behind CR
Hiko
Hiko
1229 posts
1229 posts
26 May 2009 7:45pm
If cisco turned his axles through 90 deg so the wheels were further back and were then at the correct height it would be interesting to see what the difference in handling would be even though it would be outside the wheelbase specs
There would then be a twisting moment on the axles but would that matter?
Just thinking aloud here
landyacht
landyacht
WA
5921 posts
WA, 5921 posts
26 May 2009 8:13pm
kiwi307 said...

Might pay for a couple of people to check on sail terminology here! The clew of this sail is tied, the tack is shackled and tied!

oops, gotta start going to bed earlier.


cisco
cisco
QLD
12365 posts
QLD, 12365 posts
27 May 2009 3:13am
Hiko said...

If cisco turned his axles through 90 deg so the wheels were further back and were then at the correct height it would be interesting to see what the difference in handling would be even though it would be outside the wheelbase specs
There would then be a twisting moment on the axles but would that matter?
Just thinking aloud here


Don't remember if I mentioned that in the build thread but that is the way the axles were originally set up. Then I drilled the axle extensions at 90 deg for this set up as well as making another front fork to suit the lower ground clearance.

The current set up gives 1.5" ground clearance (no pilot) or 1" with. Note the paint worn off. At 90 deg G.C. is 3" but consider also that they can go 90 deg forward or 180 deg down. At 180 deg G.C. is 5" ie X country mode.

Diablo is the first cab off the rank. More tuning, more lessons to be learnt and more yachts to be built. Cheers Cisco

kiwi307
kiwi307
488 posts
488 posts
27 May 2009 3:45am
landyacht said...

kiwi307 said...

Might pay for a couple of people to check on sail terminology here! The clew of this sail is tied, the tack is shackled and tied!

oops, gotta start going to bed earlier.


Interesting that hwhen I went to make sure that what I "knew" since I could walk was right on Wiki, I thought it was your boat they were using for the piccy Paul! Looks a little newer though.
niaychi
niaychi
97 posts
97 posts
27 May 2009 10:33am
Gizmo said...

Ok Cisco, how about this... this is how the yacht would look with zero deg. Mast step rake. The CE and CR would align, but would it change the performance at all??? or maybe split the difference and go 5 deg.

Here is a mix of Zero, Five & Ten degrees..


Gizmo how did you calculate the CR point

cisco
cisco
QLD
12365 posts
QLD, 12365 posts
27 May 2009 1:52pm
Look here www.seabreeze.com.au/forums/topic.asp?TOPIC_ID=45236
cisco
cisco
QLD
12365 posts
QLD, 12365 posts
27 May 2009 4:45pm
j murray said...

Cisco......not being a teckhead, you have a wonderful entrainment machine. If i were doing trade marking, I recon a 9 near as good as it gets it has the potential to- b- a chick magnet...........careful [}:)]


Thanks for the kind words Joe. Re "chick magnet", I doubt it and as I always say "Why eat out when there is cordon bleu on the table at home?"

cisco
cisco
QLD
12365 posts
QLD, 12365 posts
31 May 2009 10:42pm
Got the opportunity to have a sail again today. The wind was slightly stronger than last week, but not much.

Really, I would have thought that with a 1042 Hp high sitting on top of you Adelaide and Melbourneites giving you those beautiful cool and crisp winter days that you love so much, that I would have got a bit more breeze out of it. 1042 Hp is a thumping big high.

Moving right along, the purpose of the exercise today was to run the yacht at standard 3" ground clearance height, which should affect the CE/CR relationship and thereby determine if there was an improvement in performance.

The yacht was assembled with the axle extensions inserted at 90 degrees to their former position with wheels set rearwards. This increased the wheelbase length by 2" which increases the CE/CR correction as well.

The yacht duly assembled and rigged, I proceeded onto the testing ground with a precise set of measureing instruments consisting of eyes, ears, nose and attitude.

I can now say with absolute certainty that I think the yacht's performance has improved.

The front fork was not changed and is the low clearance unit. The first photo has the yacht set at 3" height rear and the second has the yacht set at 5" height rear.


If Gizmo would kindly do the honours with the CE/CR overlays and post last week's pic with these two, we will get a very good idea of how much the effect is. I tried to get the sheeting as close as possible to what it was last week. If I had been really smart I would have set the wheels as per last week, today, and taken the third shot. Cheers Cisco
Clemco
Clemco
430 posts
430 posts
1 Jun 2009 1:35pm


This is how I do it Ciaco. Print the photo out, then cut out the sail. Draw a plumb lin on a smooth wall. Use a pin to hang the sail from each corner on the plumb line, and draw the line on the paper sail. The lines will intersect at the centre of area of the sail. The centre of effort should be forward of that point. Maybe 25 to 30% back from the leading edge at that height.
I think you could move it about 100mm forward, by either raking the mast forward or shifting the mast post forward 100mm. Either way it looks like a welding job.
landyacht
landyacht
WA
5921 posts
WA, 5921 posts
1 Jun 2009 5:51pm
couple of things to keep in mind , Cis, that yacht wasfaster than your best effort at a production Blowie. Ie dont touch it.
by the time you strip it down, cut ,grind,reweld,repaint........ it will be just as quick to build another!!!!!!!.
would be a great opportinity to learn the art of glass taping over wood and build a narrower, deeper seat, more layed back rear............ then you willl be able to really compare horses with horses
Gizmo
Gizmo
SA
2865 posts
SA, 2865 posts
1 Jun 2009 8:19pm
Here is an overlay of my "guestimation" of CE and clemco's version.
The difference is that i have allowed for the roach at the top of the sail and clem has taken his line up a little higher on the leach and luff.
As previously mentioned in the CE/CR thread is that the CE point moves around quite a lot depending on sail angle to the wind, tension on the sheet rope, how much layoff on the head of the sail, etc.
Changing the wheels +/- 50mm would have limited effect, when on a sailboard the rig needs to be moved +/- 300mm to have much effect and then radically forward and back for steering.
Perhaps the best way to tell is to sail on VERY slippery mud or gravel and see if the back slides away, or gently just lift your feet from the pedals and see which way the yacht wants to go.

cisco
cisco
QLD
12365 posts
QLD, 12365 posts
1 Jun 2009 11:25pm
Have no fear landyacht, what you said is the way it is. There is no way I will be cutting this yacht. It was built true to your plan with my own "short cuts" and I doubt you will find more than a 20 mm variation from your principal dimensions.

The goal was to home build a comparable yacht that would out perform a blokart. Done and proven I believe. I told trumpy a few years ago that I would, and now it is done and done without malice. Hope you don't mind Phil.

The goal now is for Diablo to outperform itself ie tune it to it's max, which is the current process.

The next goal is to build "Loco" (Pancho's horse). Don't know what it will be yet but possibly a variation on a Promo 5. Plumb Crazy.

Following "Loco" would have to be "Hobo" in which the transition is made from recreational vehicle to expeditionary mode of transport in which I am sure walkaboutjoe will have a keen interest.

Back to Diablo. Thanks Clemco and Gizmo for the CE/CR overlays. Hopefully there will soon be some better wind. When there is I will sail the yacht in the four configureations possible with my axle extensions ie standard height short/long wheelbase and standard wheelbase ultra low/high and get a take on each position. Cheers Cisco

Edit for Gizmo:- When there was not enough wind to sail with me in the yacht, I walked behind the yacht back to base, sailing it with my hand lightly on the end of the boom. While doing this the steering would slightly but distinctly creep to windward. This would seem to indicate that the CE/CR relationship is close to what it should be but like you say when the yacht is really moving CE moves around too. So the dynamics are very difficult to measure except by pilot feedback. Without rig or sail the trike is neutral in steering.
Please Register, or first...
Topics Subscribe Reply